If you’ve ever wondered how to face swap a video without touching a timeline editor, this face swap step by step guide is exactly what you need. We’ll walk through iSamurai’s Quick Face Swap from the first upload to the exported clip — a complete face swap app tutorial with an annotated screenshot for every step, so you always know exactly what to click and why.
Quick Face Swap is built around three tabs — 1 Source, 2 Target, 3 Export — and one very smart habit: previewing your swap on a single frame before you pay for a full render. Whether you want to swap a face in a video, a GIF or a single photo, and whether the shot has one person or a whole group, the flow below covers it. Steps 1–3 are the core single-face workflow; steps 4–5 add the multi-face mapping used for group shots; step 6 is where you choose quality and hit Start.
- Step 1 — Upload your source image
- Step 2 — Upload the target video or image
- Step 3 — Check the preview before you render
- Step 4 — Detect faces on a clear frame (multi-face)
- Step 5 — Map each detected face to a source
- Step 6 — Pick a speed mode and export
- Pro tips for a flawless swap
- What people use Quick Face Swap for
- FAQ
Step 1 — Upload your source image
The source image is the face you want to see in the result. Open the 1 Source tab and drop in a photo — or tap Replace from Gallery to reuse one you’ve uploaded before. That’s genuinely all this step requires, but the photo you choose here decides most of your final quality, so it’s worth ten extra seconds of care.
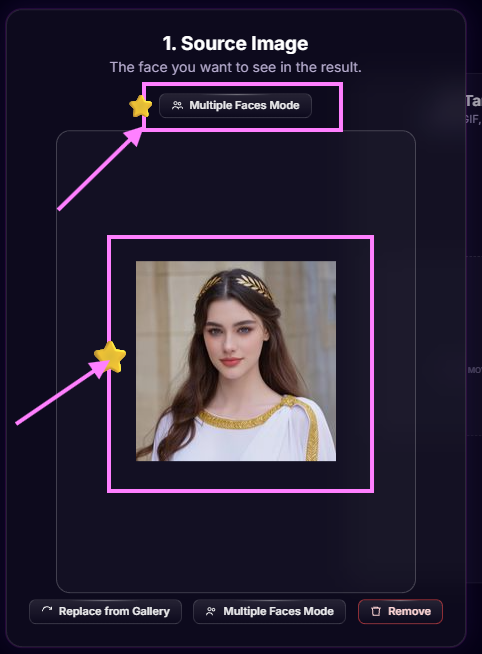
Here’s the part most people get wrong, and it matters more than any setting in this guide: use an upright, high-quality photo, and make sure the face doesn’t touch the edges of the image. A tilted or sideways photo confuses alignment; a low-resolution or heavily filtered one gives the tool nothing sharp to work with; and a face cropped right up against the border loses the context around the jaw, hairline and ears that the swap needs to blend naturally. Aim for a head-and-shoulders shot with comfortable margin around the face on all sides — like the example in the screenshot above, where the whole face sits well inside the frame.
Notice the Multiple Faces Mode button highlighted at the top. Leave it off for the classic one-face swap — every face in the target gets your source face. Turn it on when the target is a group shot and you want to control exactly who gets which face; we’ll use it in steps 4 and 5.
Step 2 — Upload the target video or image
Switch to the 2 Target tab and upload the media you want the face swapped into — a video, a GIF or a still image all work. As soon as a video loads you get a player with a timeline scrubber underneath, and this scrubber is your best friend for the rest of the flow.
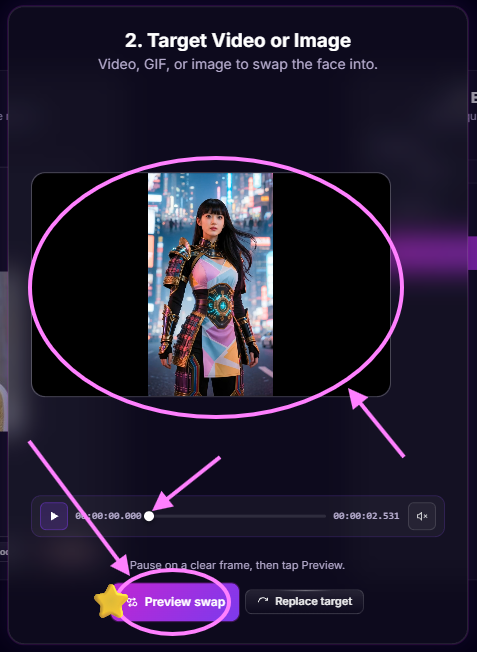
Now do what the on-screen hint suggests: drag the scrubber and pause on a frame where the face is clearly visible — facing the camera, in focus, not mid-blink and not half out of frame. Then tap the highlighted Preview swap button. This renders the swap on that single frame only, and it’s the single smartest habit in this whole ai face swap guide: a preview costs just 1 credit, while a full video render is billed by clip length. Testing on one frame first means you never spend a full render’s worth of credits on a swap you haven’t seen.
Step 3 — Check the preview before you render
A few seconds after you tap Preview swap, the preview modal opens with one fully finished frame — rendered exactly the way the final video will be rendered. This is your quality checkpoint.
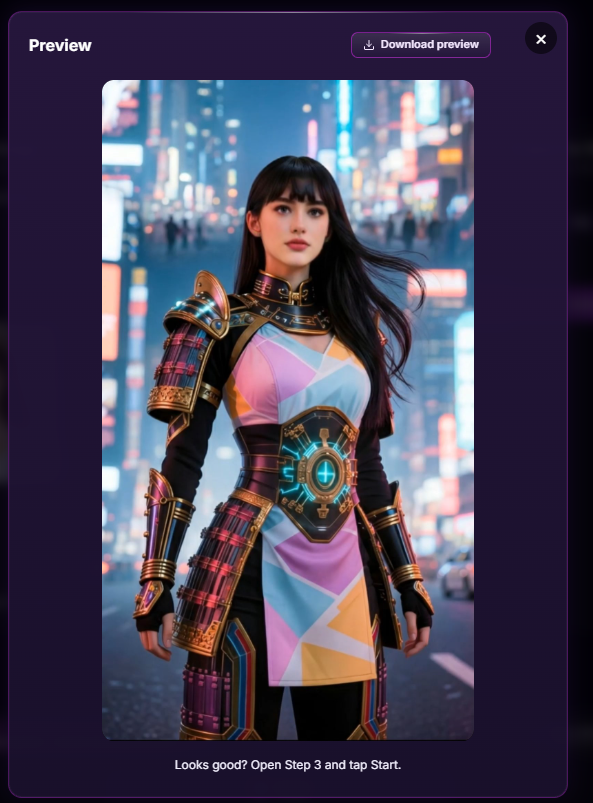
Look at three things: does the face actually look like your source photo, does the skin tone blend with the neck and the scene’s lighting, and do details like the hairline and jaw sit naturally? If something is off, don’t render — go back, pick a different frame, or swap in a better source photo, and preview again. At 1 credit per attempt you can afford to iterate until it’s right. If the frame looks great, tap Download preview if you want to keep it (a swapped photo is a perfectly good final product on its own), then follow the modal’s advice: open the 3 Export tab when you’re ready for the full render.
Step 4 — Detect faces on a clear frame (Multiple Faces Mode)
Everything so far covers the one-face flow. If your target has several people — a group photo, a scene with two actors, a music video — switch on Multiple Faces Mode and the workflow changes slightly: instead of previewing straight away, you first tell the tool which faces exist in the clip.
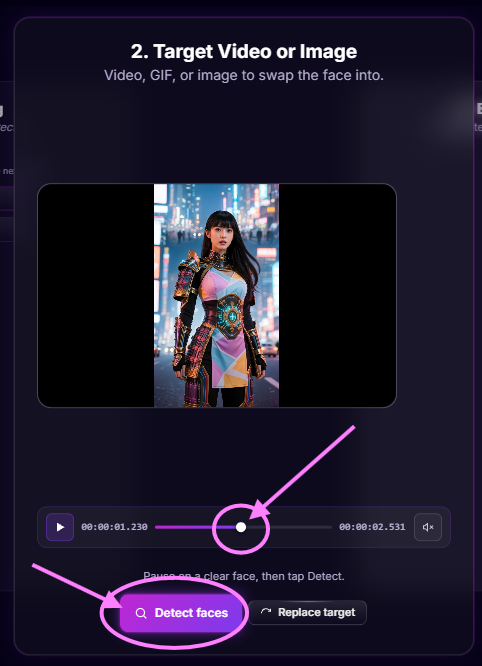
The technique is the same scrubbing habit from step 2, and it matters just as much here: pause on a clear face, then tap Detect. Detection reads the frame you’re paused on, so a frame where the person is looking roughly at the camera, in focus and unobstructed will detect instantly — while a motion-blurred frame or a face in profile may return “no face detected on this frame”. If that happens, don’t fight it: nudge the scrubber a half-second either way to a cleaner moment and detect again. One good frame is all it takes.
Step 5 — Map each detected face to a source
Once detection runs, the Source tab turns into a face-mapping panel: every detected face appears as a strip, and your job is simply to tap a face to assign it a source photo. Each mapping gets a numbered chip (P1, P2, …) so you can see at a glance which source goes to which person.
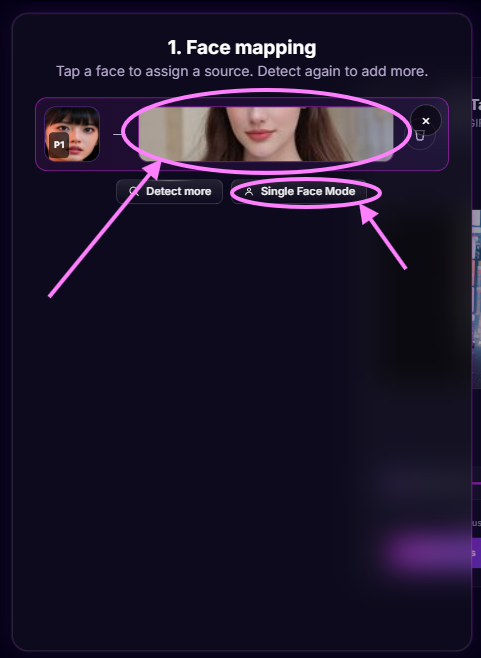
Two buttons handle the edge cases. Detect more lets you scrub to a different frame and run detection again — essential when people enter the clip at different times and never share a single frame. Detect on a frame where person A is clear, then again on a frame where person B is clear, and both join the mapping list. And if you change your mind about the whole multi-face approach, Single Face Mode switches you back to the classic everyone-gets-one-face behaviour. Anyone you leave unmapped is simply left untouched in the final video — handy when you only want to swap one person in a crowd.
Step 6 — Pick a speed mode and export
With your preview approved and your faces mapped, open the 3 Export tab. Before you hit Start, one last decision: the processing mode. Quick Face Swap gives you three, and they’re a straightforward speed-versus-thoroughness trade.
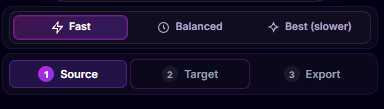
- Fast — the quickest option. Ideal for short clips with one or two clear, well-lit faces; for most everyday swaps this is all you need.
- Balanced — better detection with less distortion, recommended when faces are smaller in frame or the shot is crowded. Costs roughly 30% more processing time.
- Best (slower) — the highest accuracy with minimal flicker, built for tricky shots: fast movement, faces turning away and back, difficult lighting. Expect around 60% more processing time.
A sensible workflow: run your experiments on Fast, and switch to Balanced or Best for the final version of a clip you care about. Then tap Start. Full renders are billed by length — 10 credits per 10-second block, with a 25-credit minimum — and the finished video lands in your gallery ready to download or share. If you ever stop a render mid-way, the credits charged for it are refunded automatically. You can see how credits and plans line up on the pricing page.
Pro tips for a flawless swap
- Get the source photo right first. This is worth repeating because it fixes more bad swaps than everything else combined: the photo must be upright (not tilted or rotated), high quality (sharp, well-lit, no heavy filters), and the face must not touch the edges — leave clear margin around the whole face so the tool can read the hairline, ears and jaw in context.
- Always preview before you render. One credit on a single-frame preview beats a full render on a swap you’ve never seen. Iterate on the preview until it’s right, then export once.
- Pause on clear frames. Both Preview and Detect read the exact frame you’re paused on. A sharp, front-facing, unobstructed moment gives you clean results; a blurry mid-turn frame gives you retries.
- Use Multiple Faces Mode for group shots. Mapping each person to their own source is what turns a gimmick into a believable group swap — and unmapped people stay untouched.
- Match the vibe when you can. A source photo with roughly similar lighting and head angle to the target blends more naturally than one shot in radically different conditions.
- Fast for drafts, Best for keepers. Save the slower modes for the final export of clips with movement, small faces or difficult light.
What people use Quick Face Swap for
Creators drop their own face into trending clips and templates for shorts and reels. Meme-makers live in the preview button — a swapped single frame is often the whole joke, downloaded straight from the preview modal. Marketers localise one filmed performance into many presenter variants without a reshoot. Friends and families swap each other into films, music videos and group photos, which is where Multiple Faces Mode earns its keep. And when a face swap isn’t enough — because the hairstyle gives it away — the next tool up is a head swap, which replaces the whole head including hair: see our guide on how to head swap a video. Need to go even further and replace the entire person, outfit and all? That’s character swap.
FAQ
How do I face swap a video step by step?
Upload a source photo of the face you want (Step 1), upload the target video (Step 2), pause on a clear frame and tap Preview swap to check the result on one frame, then open the Export tab, pick a speed mode and tap Start. For group shots, turn on Multiple Faces Mode and map each detected face to its own source first.
What makes a good source photo for a face swap?
An upright, sharp, well-lit photo where the face sits well inside the frame with clear margin on all sides — never cropped against the edges. Avoid tilted photos, heavy filters, sunglasses and extreme angles. A clean head-and-shoulders shot facing the camera is ideal.
Can I test the swap before rendering the whole video?
Yes — that’s what the Preview swap button is for. It renders the swap on the single frame you’re paused on for 1 credit, exactly as the full video would look. Only start the full render once a preview looks right.
Can I swap multiple faces in the same video or photo?
Yes. Turn on Multiple Faces Mode, pause on a clear frame, tap Detect faces, then tap each detected face to assign it its own source photo. Use Detect more on other frames to add people who appear later in the clip. Faces you leave unmapped stay untouched.
What’s the difference between Fast, Balanced and Best?
Fast is the quickest and suits short clips with one or two clear faces. Balanced detects better with less distortion — recommended for crowded shots or smaller faces — at about 30% more processing time. Best (slower) gives the highest accuracy with minimal flicker for tricky shots, at about 60% more time.
Does it work on photos and GIFs, or only videos?
All three. The target can be a video, a GIF or a still image. For a single photo, the preview itself is effectively your result — you can download the swapped frame straight from the preview modal.
How much does a face swap cost?
A single-frame preview costs 1 credit. Full video renders are billed by length at 10 credits per 10-second block with a 25-credit minimum, and stopping a render refunds its credits automatically. Plan details are on the pricing page.
What if I want to swap the whole head, including hair?
Use head swap instead — it replaces the entire head, including hairstyle and head shape, which is the right tool when the hair would give a face swap away. There’s a full walkthrough in our head swap guide.
Try it
The fastest way to learn how to face swap is to run one: upload a source photo, pause on a clear frame, preview for a single credit and export when it looks right. Open iSamurai free and run your first swap in the next five minutes.